This post is a public service announcement. To all you Sewists out there - I Want You to Dye.
Fabric. That is. I want you to dye fabric. Not just flat colors, either (though that's an acceptable place to start) but crazily unique and fabulous prints that come out of your own gooey head!
As you guys probably know already, I kind of have a
thing about hand painting/dyeing fabric. And while I'd love for you all to think that I have been entrusted with some mysterious artistic knowledge (the kind that is passed down by word of mouth in hushed voices during clandestine initiations performed to a full moon wearing all white... so you can dye it...
obvs.) that would just be a darn lie. Dyeing fabric is easy. And I'd like to share my secrets with you.
 My first foray into hand dyeing (posts here and here)
So why dye your own fabric?
- You know how awesome it feels when someone is like, "Omigod where did you get that??" and you get to be all like, "Ohgeethanks I made it!" and they're all like "Whhhaaattt??? Girl. No you di'int." ? Yeah, now imagine adding in "And I made the fabric too." Minds. Blown.
- It's like wearing a painting - except not weird.
- After the initial cost, it's cheap! And even the initial cost isn't too bad compared to what you'd be spending at the fabric store. (This is not to say that this should replace your fabric buying addiction. Ohhh hoho no! I'm all about enabling. Consider this more as a little eccentric jewel in your handmade wardrobe.)
- It's analogue. I'm going to reveal something about myself here. For someone my age, and a blogger to boot, I'm utter crap with technology. I've tried, but I just can't wrangle Illustrator into doing what I want. I'm far more at ease working with my hands. I can't be the only one, right?
- You get to feel like a crazy mad-scientist mixing up your concoctions in your kitchen sink. And who doesn't love a little bit of role-playing, right?
- The results are awesome. Nuff said.
 |
| My second attempt at dyeing - post here. Also, I always think this picture looks like I'm trying to grow a unicorn horn! |
 |
| Third dyeing project, and one of my favorites. See posts here and here. |
 |
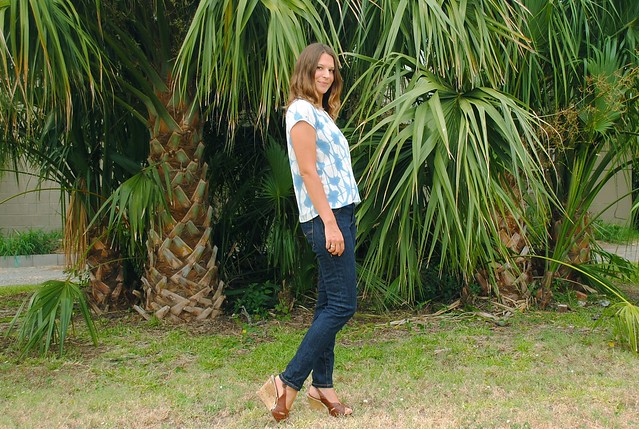
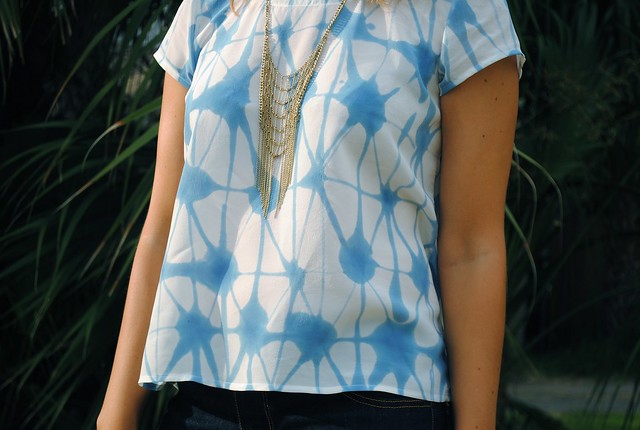
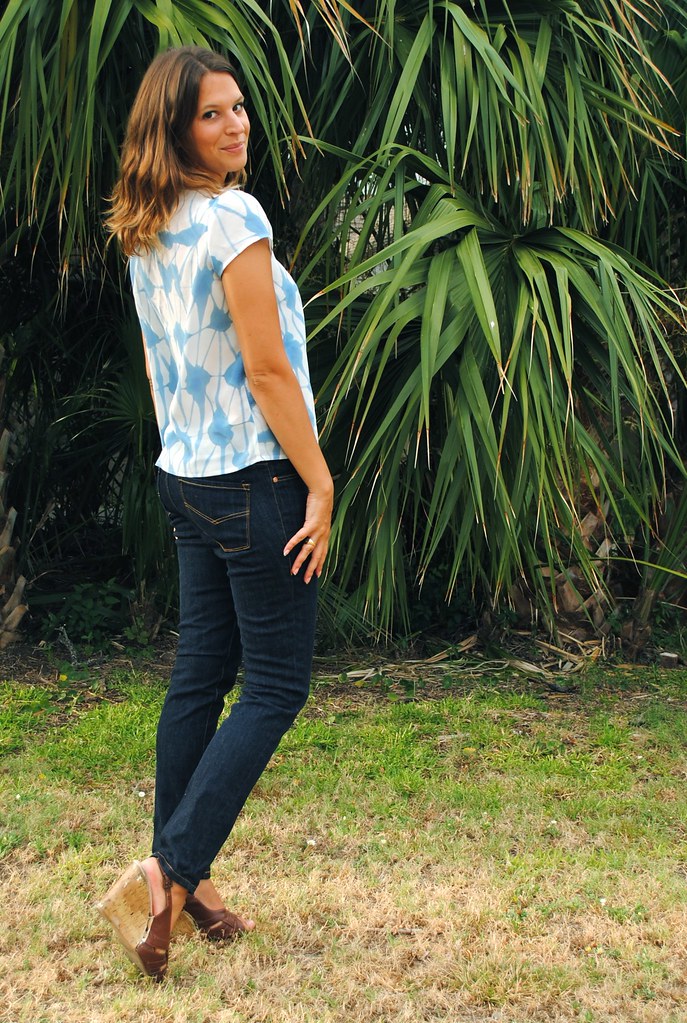
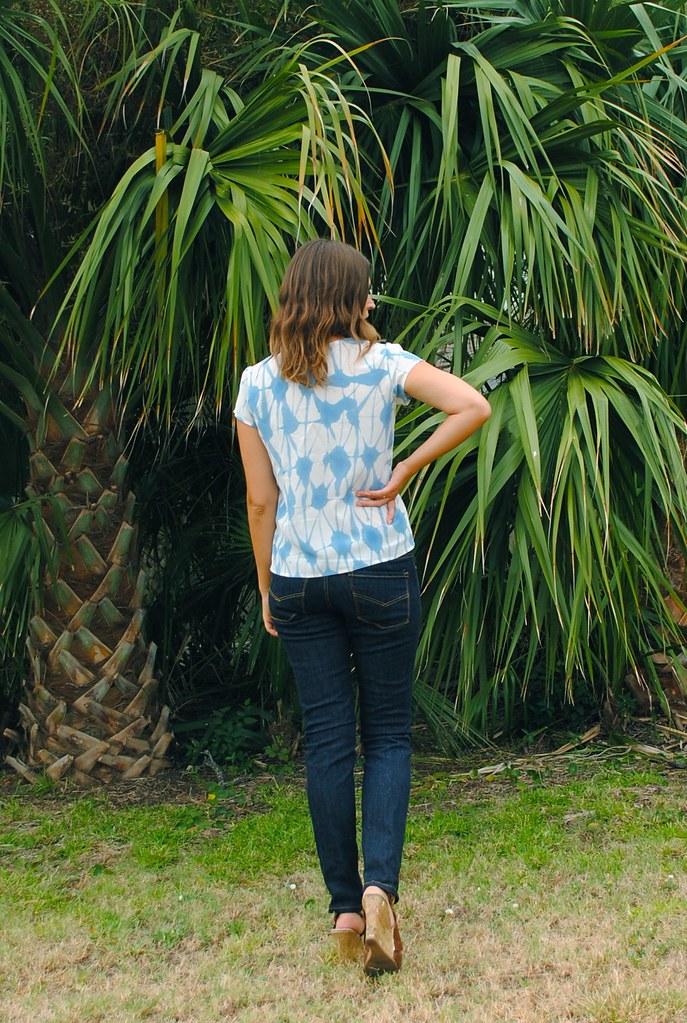
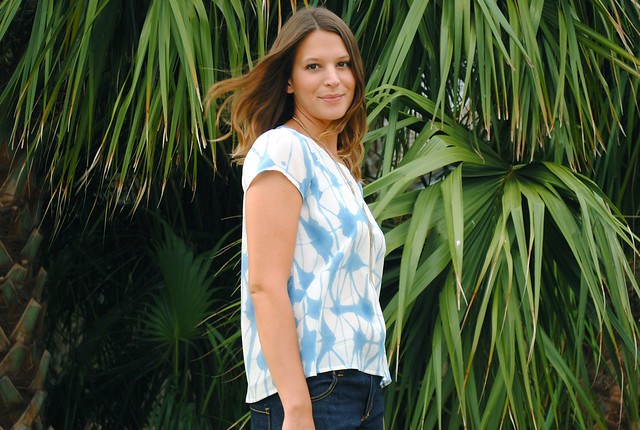
| And this little number is for a secret special project that I won't reveal just yet. |
Do I have you convinced? Good! Then let's do this thing! This is bound to be an extra long post, so feel free to bookmark it for later, or go ahead and make yourself some tea and grab a snack. I'll wait here....
Back? Okay! Then let's just jump in... The first thing I want to tell you about dyeing your own fabric is:
It's unpredictable. Perhaps this is where fabric dyeing gets it's intimidating reputation...? But I don't really see this as an obstacle. I'm putting it out there in the beginning because I think it's a good reminder of what sort of head-space you should try to be in when you embark on your dyeing experiment. There's always a little bit about the dye process that is out of your control, and that's the fun part. You can't totally predict how a color will turn out once you wash it out, or get the full picture of how a pattern will look repeated over 4 yards of fabric, and most likely you won't be able to get your pattern to look perfect. But remember, you're dyeing by hand, it's not supposed to look manufactured! Oftentimes I'll begin painting my fabric with one idea, only for it to slowly shift as I work down the yardage, and I might have to go back and add little bits to create a more cohesive overall look, but I'm okay with that, it's part of the process. Also, some of those little unpredictable quirks (the subtle shift of a color once it dries, an unexpected texture, color bleed, lack of symmetry...) can be the things that make your fabric extra cool.
Supplies:
Now, let's look at what you
need to dye. I'm going to say right off the bat that my main source for dye supplies, including fabric, is
Dharma Trading Co. They have a great, informative website, and their products are really quality. But you'll need other odds and ends too, many of which you may already have laying around the house. I've broken this into categories based on where you're most likely to find these things.
A word about Dye & Fabric
These instructions are only for procion dyes - which come in powder pigment form and are great for dyeing all natural (cellulose and protein) fibers - that means cottons, rayons, hemp, silks, linens and wools. You can use any white, natural fibered, fabric for your project - but, as I said, I recommend the ones offered from Dharma because they are meant to be dyed, and they're a decent price.
Hardware Store Stuff
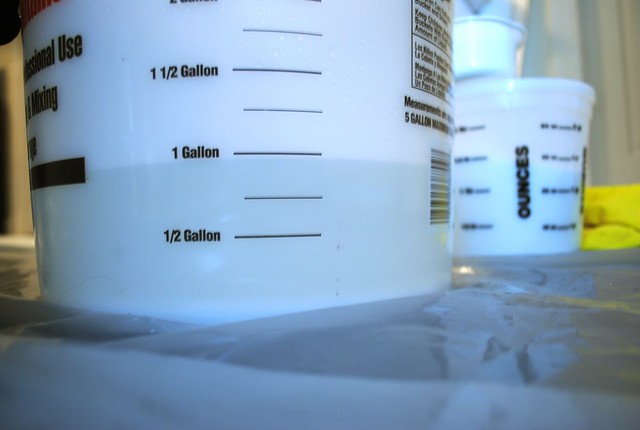
- A large bucket (I highly recommend one with measurements along the side, it makes knowing when you've got a gallon of water soooo much easier!)
- A few smaller buckets for mixing dyes (optional - you can also reuse glass jars, yogurt containers, etc.)
- Dust masks (dyes are loose chemical pigment, which are harmful to breathe in).
- Large sheets of plastic for protecting the floor and for rolling up wet fabric in to let cure
Household items / Grocery store stuff
- Plastic measuring cups and spoons (I recommend not using the same stuff you use to cook, buy a separate set just for dyeing)
- Long plastic gloves
- Empty jars (optional - can also use small buckets - see above)
- Blue Dawn (or synthrapol, but this is cheaper and works just fine)
- Tea kettle or some other container for heating up water
- Regular old kitchen salt
Art Supply Stuff
- A variety of medium to small paint brushes. Realistically, I only use about three.
Dye Store stuff
- Procion Dyes (you can start with any colors that tickle your fancy, but if you're looking to build a "palette" of mixable colors, you'll want 2 shades (warm & cool) of your primary colors: red, yellow, and blue, as well as a few secondary colors like a good purple, green and orange, and maybe some neutrals like black, brown and tan. Although, really, I just bought the colors I liked.
- Soda Ash fixative - this is a necessary chemical to get the dyes to "fix" or become permanent.
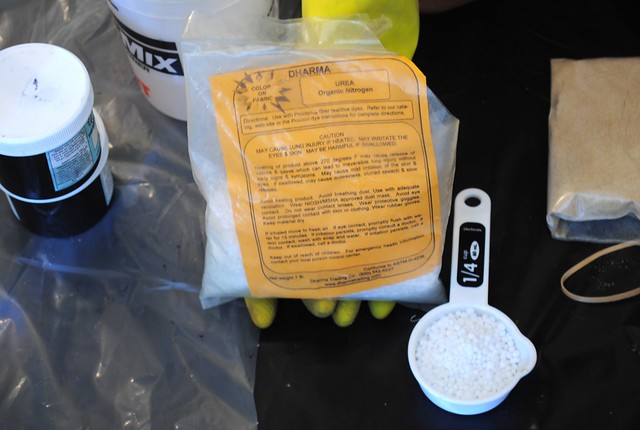
- Urea - this is an optional additive, but I like to use it when I paint fabric because it keeps the fabric moist, and since it is important for the dye to stay wet in order to "set", and painting fabric can take awhile, I think this is an important additive for the process I'm going to show you in this post.
- Sodium alginate - totally optional. This is a thickening agent that can be added to dye to make it more 'paint'-like and reduces the watercolor-y, bleeding effect of the dye.
- Fabric - cotton, rayon, hemp, silk or wool. I recommend working on continuous yardage - although you can dye a finished garment (just remember that the polyester thread will not take the procion dye). I do not recommend cutting out your pattern pieces and then dyeing, because you will be handling the pieces alot, and quite roughly, and they're bound to stretch and warp in the process.
Now you have everything you need to dye! This next section will walk you through getting set up to start painting your fabric, including mixing your chemical water and your dyes.
Getting Started:
Pre-wash and dry your fabric. Even though you may have bought fabric that is good for dyeing, it's always a good idea to wash your fabric with a little bit of blue Dawn (or synthrapol if you prefer) first to get off any residue or oils that may be stuck to it.

Protect your work surface. Even if you are going to be dyeing fabric in your garage, or on the roof of your building or something, it's a good idea to lay down some plastic first. This will protect your floors (and keep your landlord happy) and also protect your fabric from any dirt that may be on your floor (although I always recommend a quick vacuum before starting, but this could just be because I have two constantly shedding animals in my house). I like to lay down a thinner piece of plastic on top of this one, and
then lay down my dry fabric. Then once my fabric is painted I'll roll it up in the thinner plastic and let it "cure" for awhile.
Mixing the Chemical Water:
Chemical Water just describes your water all prepped for dye. We'll use this as the base to mix our dyes.
- Put the kettle on to boil. These instructions will make a gallon of chemical water, which is what I make every time. (If you are good at the maths then you can adjust these water/chemical ratios to make smaller or larger batches of chemical water.)
- Pour the boiling water into your large bucket. Then double the amount of water with warm water from the tap. You want to end up with a gallon of hot, but not scalding, water.
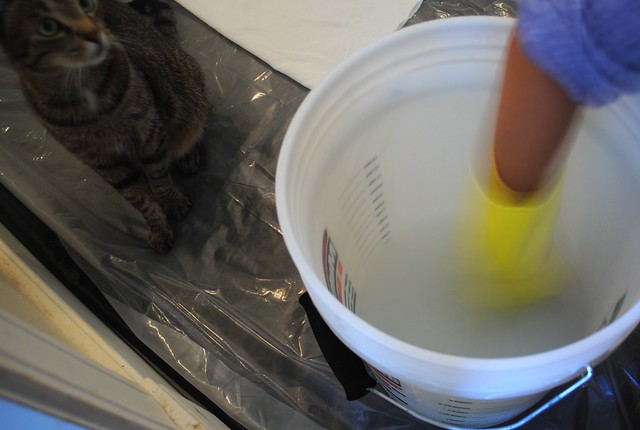
- To the hot water add: 1/2 cup of salt & 1/3 cup of soda ash. Important! Do not put the soda ash in the bucket, then add water, it forms a solid rock at the bottom of your bucket!
- Mix with your begloved hand. Watch out for sneaky photobombing kitties.
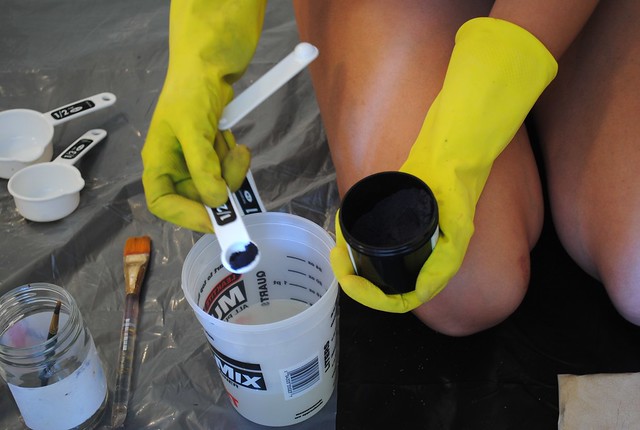
Mixing Your Dyes:
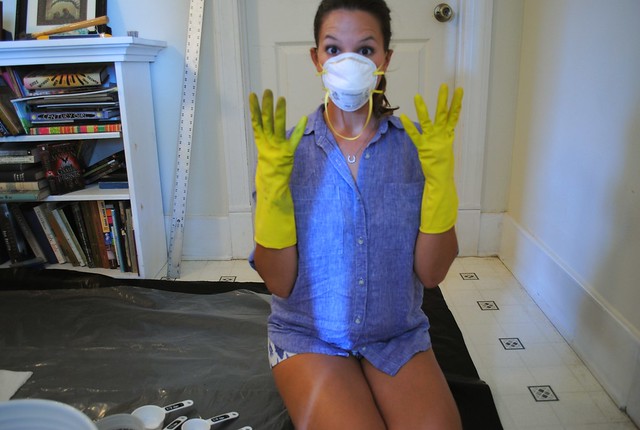
I swear I'm wearing shorts in these photos!!
- Make sure you put on your dust mask and keep your gloves on before you open any dye containers! Safety first!
- Scoop about 2 cups of chemical water into a smaller bucket or jar. It doesn't have to be exact. For this sample I used 1 1/2 cups of water.
- Add Urea. The ratio I'm familiar with is 3/4 cups of urea for every quart of chemical water (for direct application, i.e. painting, like we're doing here). Since I'm only making 1 1/2 cups of dye I had to do some maths (actually, my husband had to do some maths) to figure out how much to use. I used just under 1/4 cup. Stir it up real good so all the little urea beads dissolve.
- Using your measuring spoons, measure out about 1/4 teaspoon of dye. The rule of thumb here is that for every gallon of chemical water, you use about 2 teaspoons of dye to get the maximum vibrancy. You want to adjust this for using a smaller amount of water, however you can play with this too. If you want a darker color, use more dye. For lighter, more pastel shades, use less dye. I generally just eyeball this, no maths involved.
- To mix your own colors you just want to sprinkle a small amount of your dye into the chemical water at a time. Start small and add slowly. It's easy to make a dye darker, but damn near impossible to get it lighter once you go too dark! Unfortunately there are no hard and fast rules for this sort of stuff - you just have to use your eye.
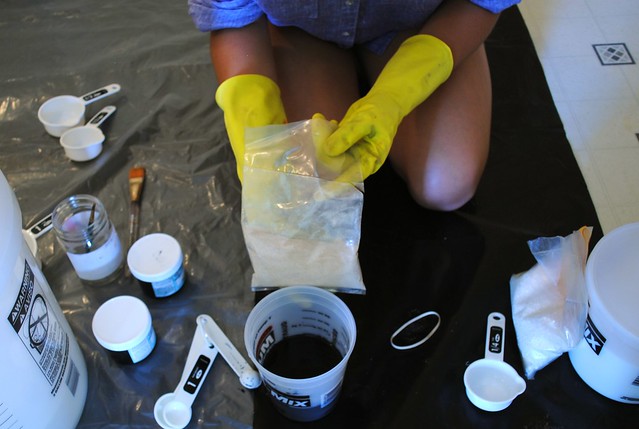
- If you want to thicken your dye to make it more of a 'paint'-like consistency, and so it doesn't bleed as much you can add a little sodium alginate to it. (Bonus! This also acts as a very light resist.) For my sample I did not add thickener to it. But basically you just sprinkle some into your dye mix and let it sit for a bit. It will take on a slightly gel-y consistency. Don't add too much, it thickens with time.
- Do this for as many colors as you think you are going to use - hence, creating your "palette", so to speak.
Painting Your Fabric:
While you might want to just get started on your white fabric, it's sometimes nice to dye your fabric a base color first. If you want to do this - I recommend using the leftover chemical water bucket as your dye bath, and dunking your fabric directly in there. Wash it again (following the instructions below for washing out your dye) and dry it before preceding onto the next steps. For the sake of simplicity, I'm just doing a simple, direct design in one color on my white fabric.
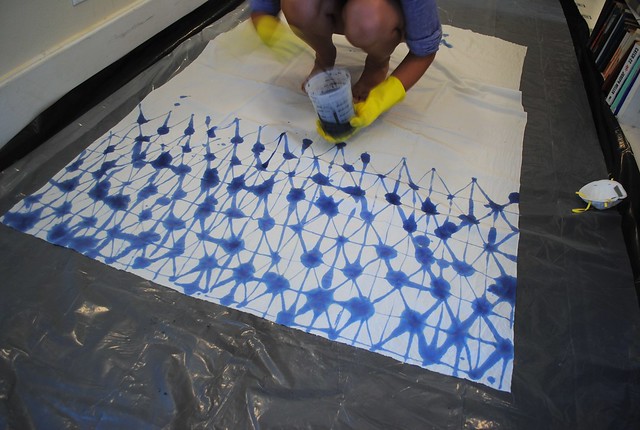
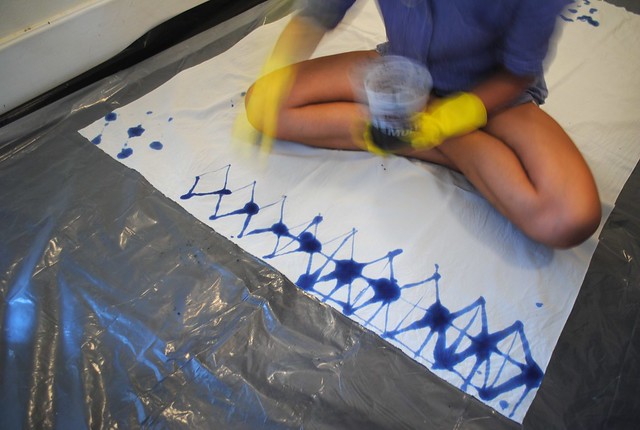
Unfortunately, I can't really give you any cold hard facts about painting your fabric! This is where your own creativity comes into play. I can say this, though, if you are nervous about just going to town all willy-nilly on your fabric, then don't. Come up with a plan. It's much easier to work off a system than it is to just start throwing dye around and seeing what happens. Mentally create a grid on your fabric (you could even draw one out lightly with pencil, or a washable marker) and start from there. Geometric prints like stripes, dots, squares or diamonds are great places to begin - and they will still look totally unique and special because they are made by hand.
Additionally, if this is your first time with this, start with only one or two colors. Something like colored dots on a white background can be a great, fast and easy place to start, and anyone can do it. The more colors you add, the longer you'll be dyeing and the more complicated your pattern will become.
If you are using multiple colors, it's easiest to work one color at a time, like you're legitimately a fabric printer. Think of your pattern as building layers of color. Work from the lightest color to the darkest color.
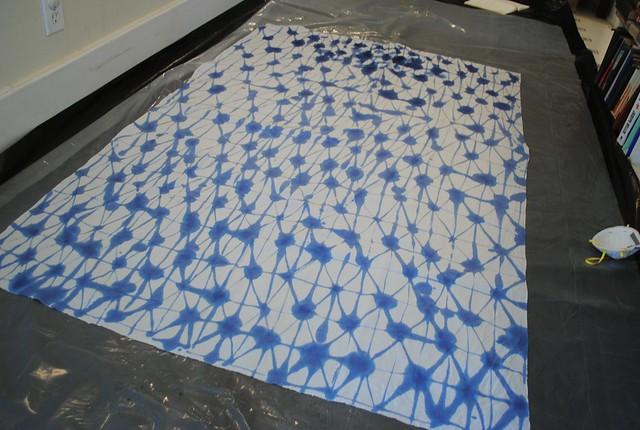
Once you finish, roll your fabric up in the plastic and store it for at least 4-5 hours, up to a day.
Washing Out Your Dye:
After you've let your dyed fabric sit for at least 4-5 hours (I usually leave mine overnight) you can unroll your fabric and rinse it. Rinse it first in cold water without soap. I do this right in the sink. The cold water will stop any chemical reaction that may still be happening with the dye. You may see some color bleed out, that's totally normal. Rinse your fabric until the water runs clear-ish.
Then you want to wash your fabric in
hot water with another squirt of Dawn or synthrapol. This will get out any remaining loose dye molecules and you're dye will be set! I do this in the washing machine, but you could also do it at your sink - just be really thorough. Yes, even silks can take the hot water (protein fibers are
tough y'all!) Hang or tumble dry, and that's it!!
If I'm doing multiple layers of color - like one flat base color and then a design on top of it - I wash the dye out after doing the flat color. I
don't wash the dye out after each layer of color in the design. Does that make sense?
Clean-up:
I've never had a problem with my dyes staining anything, but as you can see, I'm pretty thorough about making sure my work surface is protected, and I never take off my gloves until I'm done with the whole dye process.
I generally pour any unused chemical water or dye down the sink. I'm not sure if that is entirely environmentally sound, but I think there are worse things I could be putting down my sink. Then I rinse my sink, so the dye doesn't stain the porcelain. All brushes and containers just get rinsed with water.
You
can save your chemical water if you have a lot left over. You just need to add hot water to it again to bring the temperature back up, then adjust the soda ash and salt levels to compensate for the added water. This might be a good idea if you think you'll be doing
a lot of dyeing, but for my purposes it never really made much sense.
Additional Resources:
I really learned a lot about dyeing from
Dharma's website. I hate sounding like a broken record, but they just have a plethora of information packed on there. Also, their customer service people are brilliant. If you have a question about a technique or product, or just need to trouble shoot, you can call and talk to someone, and they are super knowledgable and helpful.
I think, like many people, I was really intimidated by the prospect of dyeing in the beginning. It seemed like everything needed to be so
exact or else, I don't know, you'd blow up your kitchen, or something! So when I decided to take the plunge I signed up for
The Art of Cloth Dyeing with Jane Dunnewold on
Craftsy. This class is really great if you're the kind of person who needs to know the
why behind the
how. Like, what exactly
chemically speaking, is going on here. Jane covers all that in a really,
really down to earth way. This class also taught me that dyeing actually doesn't have to be exact. You can still get great results if you just kind of fudge it. Truth. It also covers a lot of really beautiful shibori-esque dye techniques, which are really popular right now.
And finally, you can give me a shout out! I'm far from being an expert, but I'm certainly enthusiastic and I've had my fair share of trial and error.
Well, friends, I hope I've piqued your interest in fabric dyeing, and that you found this to be an informative post! A huge
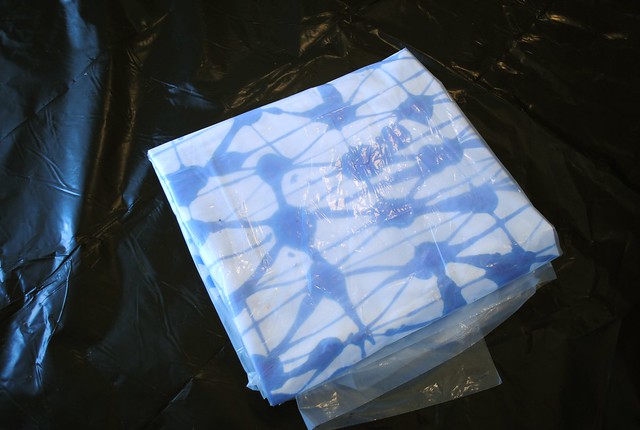
thank you to my husband for being my lovely assistant in getting this process photographed. And now, stay tuned to see what I'm going to make with that kooky blue diamond pattern up there!
xx