1.27.2012

tutorial: fun with clovers - part three


well here we are again - with the third installment of clover adaptation! and, friends, we are in the home stretch. but before its smooth sailing - its time to sew your fly.

sewing a fly front on your pants isn't hard - but it does involve a number of steps and some finnicky small parts. the first (well first few, really) times i sewed a zip fly it went woefully wrong. i cut holes in my pants in places where you don't want holes. i was following the instructions in the built by wendy sew u book, which, while they are relatively straightforward, were a bit confusing for a beginner.

when i sewed my denim clovers i sat down with the built by wendy book and a pair of ready to wear jeans and really examined them, going back and forth between the instructions in the book and really inspecting a ready-to-wear fly. as a result, the instructions i'm going to give are a bit of an amalgamation of the built by wendy instructions, and my own observations.

i'm no fly expert - by any means - just some chick who's sewn a fly front or two, and made plenty of mistakes, in my time. but hopefully these instructions will be clear enough to help anyone who's been suffering from some fly front phobia.

now - down to bweez-nezz! (thats business to you folks...)

sewing your fly will be the first thing you do to your pants. so gather together your materials:
  • your cut and marked clover pants fronts
  • a 5 inch jeans zip (or another short zipper)
  • your right fly extension piece - cut on the fold
  • scissors and pins
  • topstitching thread (optional - not pictured)
i, obviously, am making myself some red pants. this is leftover wool gabardine from my red jacket. i underlined it in silky cotton voile and machine basted the two layers together (because, to be perfectly frank, i needed a break from hand sewing!) all my little interior pieces - like the pocket bags and waistband facing and right fly are cut from that stripy cotton canvas.

i won't be doing the traditional "jeans" style topstitching on my trousers because of my fabric choices - but i will tell you throughout the instructions when to add topstitching. if you are using a heavy fabric, like denim, your topstitching will look best if its done in topstitching thread. you can choose a contrasting color like yellow or orange for a nice "pop".

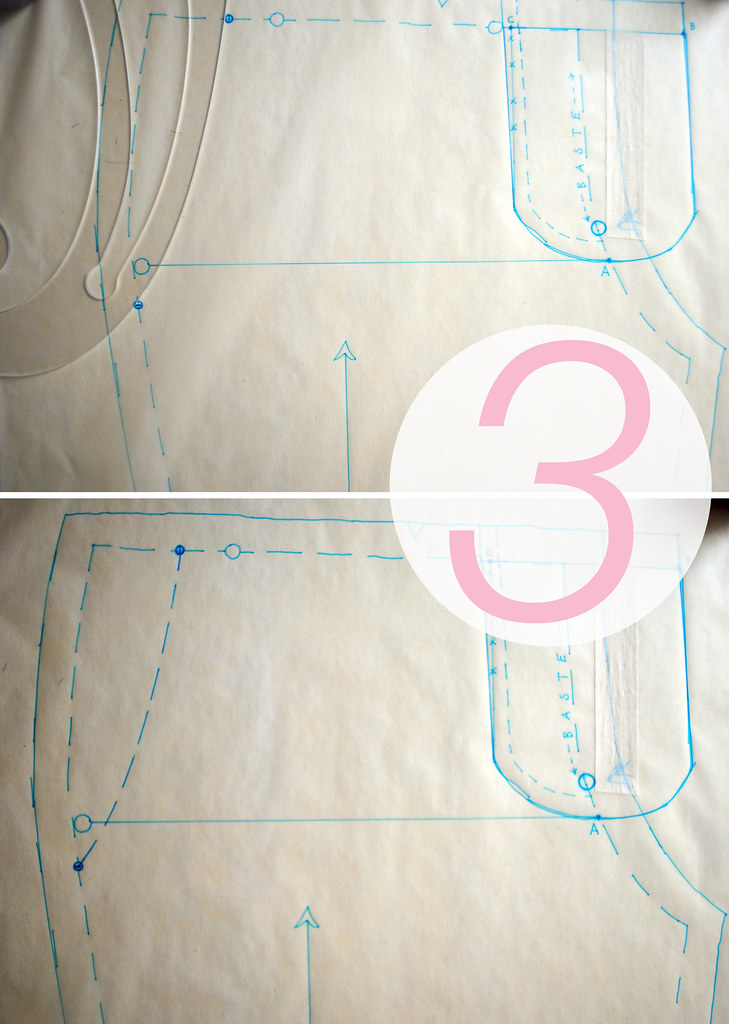
1. pin your pants fronts together along the CF (center front) line. stitch, using a long basting stitch from the top of the pants to the circle on your CF line (the blue pen is pointing to it below). then continue stitching using a short stitch length from the circle to the end of the crotch curve.


2. spread your pants front on a table, right side facing down. spread open the fly and locate the right fly piece. trim just the fly piece down 3/4 of a an inch.


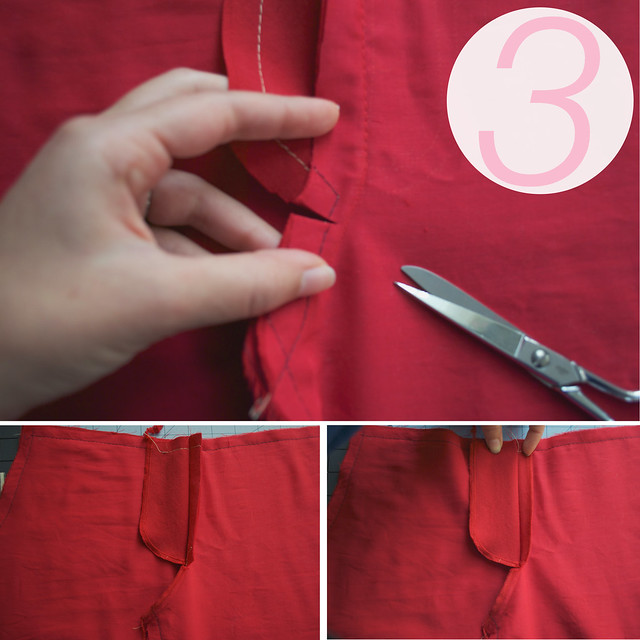
3. hold both the left fly and the trimmed right fly together and make a clip in the front rise - right up to your stitching - just at the bottom of the fly curve. finish your left fly edge, your crotch seam, and the trimmed right fly using an overlock stitch, a zig-zag stitch or pinking shears. i will be finishing all my seams with my serger. i recommend that you finish each of these edges separately, holding back the rest of the pant as you do. this is especially true if you are using a serger. i also recommend lowering (or disabling) the knife blade on your serger when you sew around the bottom of the left fly extension and the crotch seam. i learned this from experience - the second time i tried to sew a fly - when my serger's knife hungrily chomped a hole right into the crotch of my pants! unrepairable!


4. fold your right fly extension piece with right sides together. stitch along the curved bottom. turn it right side out and press. finish the long, open edge by overlocking, zig-zag, or pinking (alternately you can sew down the long edge and the bottom curve all together, turn it right side out and press if you prefer).


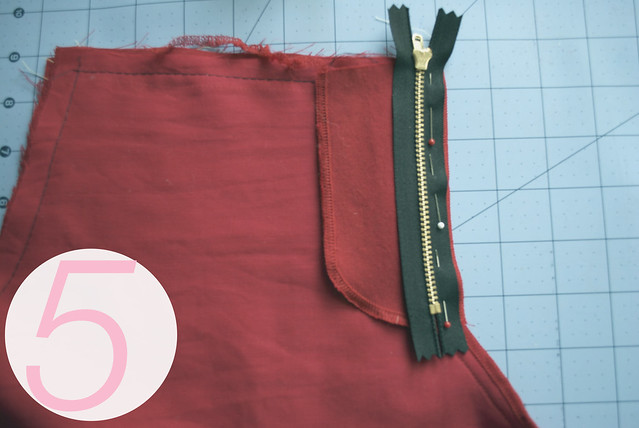
5. fold your pants fronts with right sides together. lay your zipper upside down over your CF seam - aligning the teeth with the basted CF seam. pin the zipper tape to the trimmed right fly. the bottom stopper of your zipper should fall to the bottom of your fly pieces. if your zipper is long - let the extra length go off the top.


6. with the zipper foot on your sewing machine, stitch the zipper tape to the trimmed right fly. make your line of stitching about 1/8 of an inch away from the zipper teeth. reverse stitch at the top and bottom.


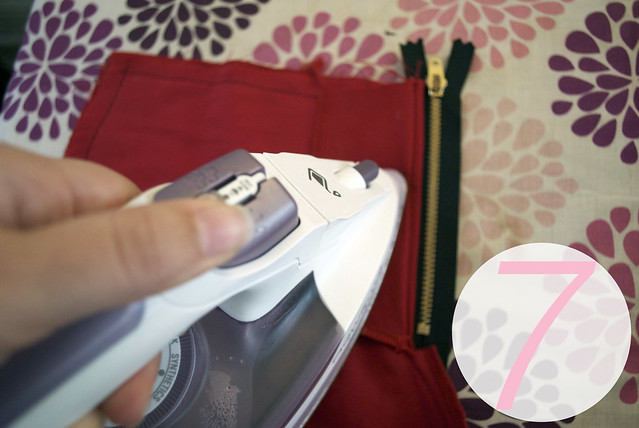
7. press the fly away from the zipper teeth.


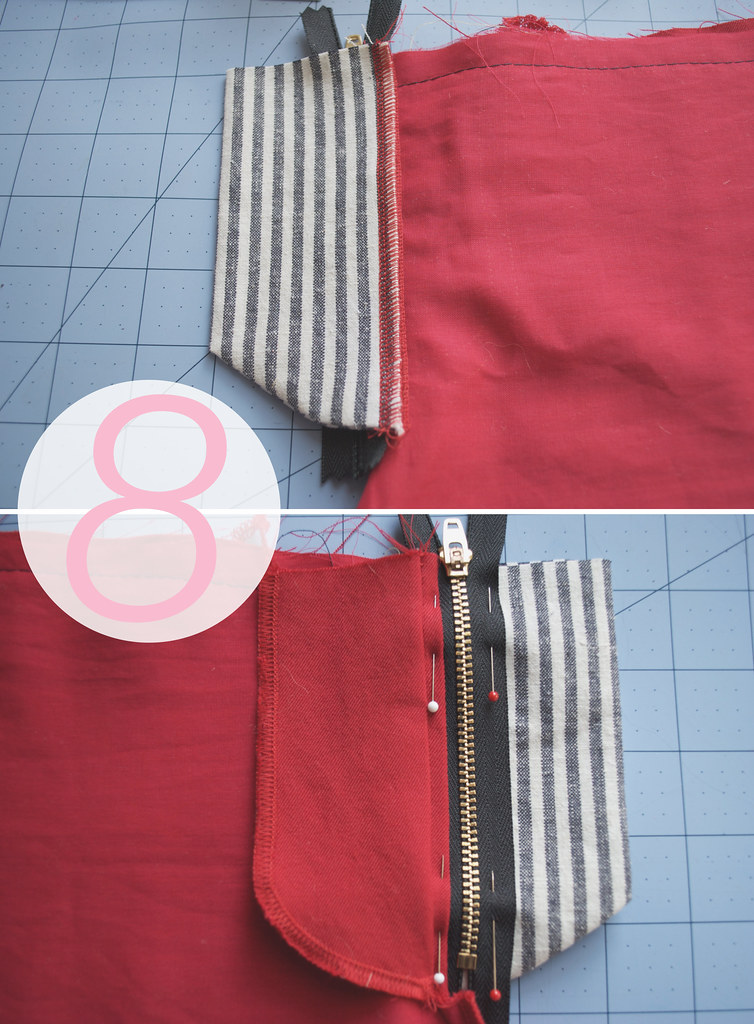
8. fold your pants right sides together and lay them so that the trimmed right fly is against the body of the pants and the back of the zipper is up. align the finished (in my case, serged) edged of the right fly extension with the finished edged of the trimmed right fly - sandwiching the zipper tape in between. with the zipper tape right side up, pin the tape to the right fly extension on both sides of the zipper teeth. this will keep your zipper tape and fly extension from shifting while you stitch.


9. with your zipper foot on your machine, edgestitch along the right fly (which should be pressed back away from the zipper) as close to the zipper tape as you can get. stitch through the right fly, the zipper tape, and the right fly extension - but not through the body of the pants! if you are doing topstitching this should be done in your topstitching thread.


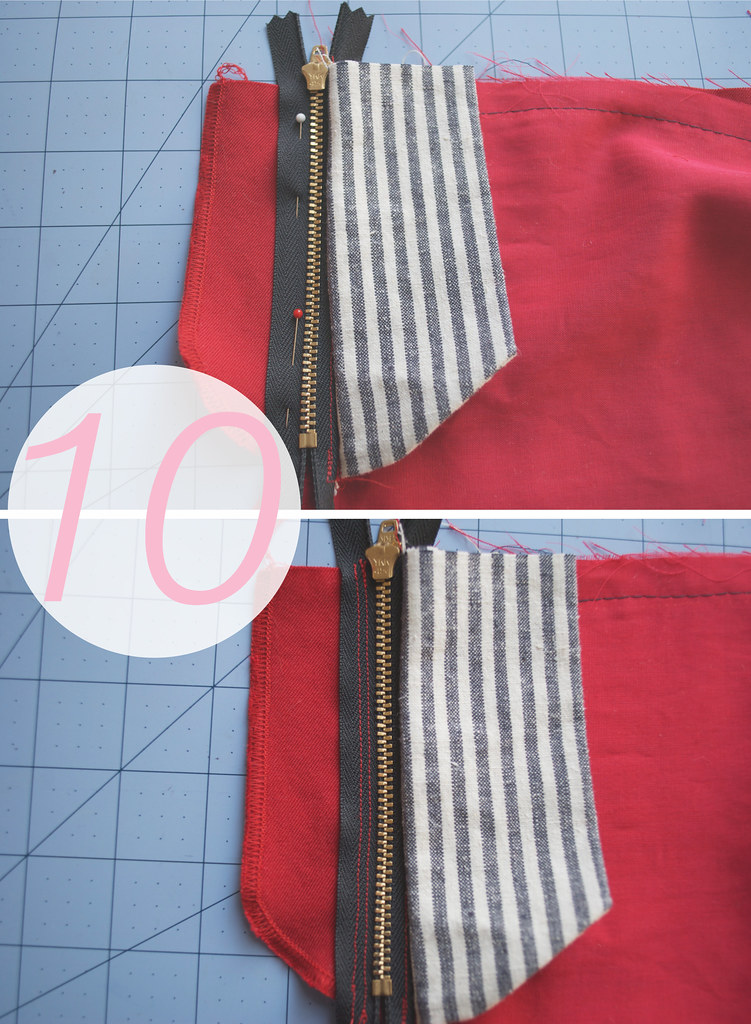
10. hold the body of the pants away from the left fly. spread the fly open and lay the other side of the zipper tape against the left fly. the zipper should be upside down with the teeth even with the CF seam. hold the right fly extension back and pin the zipper tape to the left fly. with your zipper foot on your machine, stitch the zipper tape to the left fly. make one row about 1/8 of an inch away from the zipper teeth and a second row 1/8 of an inch away from the first. backstitch at both ends.


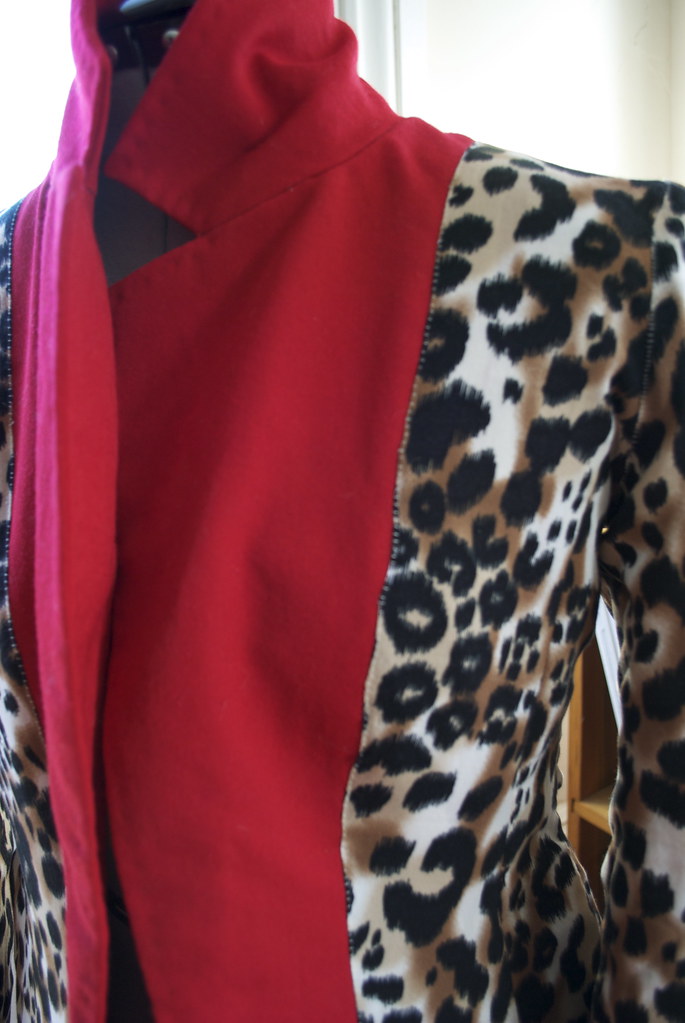
11. lay your pants face down over a sheet of carbon paper or chalk paper. hold the whole fly apparatus over to the right, and using a tracing wheel, trace over the topstitching lines you should have marked on your pants from drafting your fly. these lines should follow the shape of the fly. flip your pants over so they are face up and pin the left fly (the red fly on my pants) to your pants front. hold the right fly (the striped fly on my pants) out of the way and topstitch along your traced lines - securing the left fly to the body of your pants. if you want a more "jeans" styling to your fly - do a second row of topstitching 1/4 inch in from the first. as you get close to the CF seam you will probably be sewing over your zipper teeth. if your machine is anything like mine, it won't like this very much. just go slow, and use the hand wheel if needed.

at this point - if you are doing the full shebang with the topstitching - you can add a row of topstitching about 1/16 of an inch (in other words, edgestitched) down the CF seam - on the same side as you just topstitched.


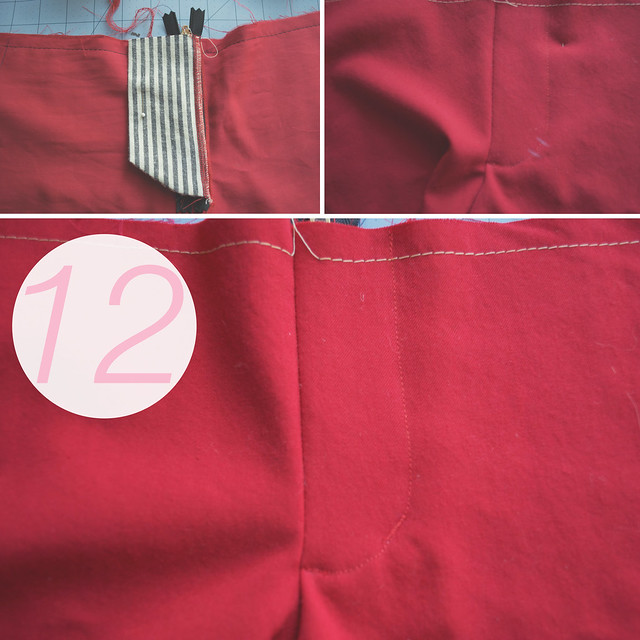
12. with your pants face down, lay the right fly extension over the left fly and pin in place. on the right side of the pants mark the placement for a bar tack. the bar tack will go through all layers of your pants and hold your right fly against the left. typically it falls along the front topstitching, right where the curve begins to straighten out. your bar tack should be about 1/4 inch long. to make a bar tack choose a zig zag stitch on your machine and set it to a small stitch length. go back and forth over the same 1/4 inch about 3 times.

tip: if your machine has an automatic buttonhole feature you may want to use that selection since most machine buttonholes will feature a close set zig zag.


13. make a mark along the CF seam for a second bar tack. this tack should fall about 1/2 inch above the point where your fly topstitching meets the CF line. again, the bar tack should be about 1/4 inch long and fall perpendicular to the CF seam - it can even cross the seam just a smidgen. use the same zig zag stitching to make this bar tack - sew through all layers. this might be a bit tougher because you will be going over the zipper teeth, but again, just take it slow and use the handwheel if things get rough.


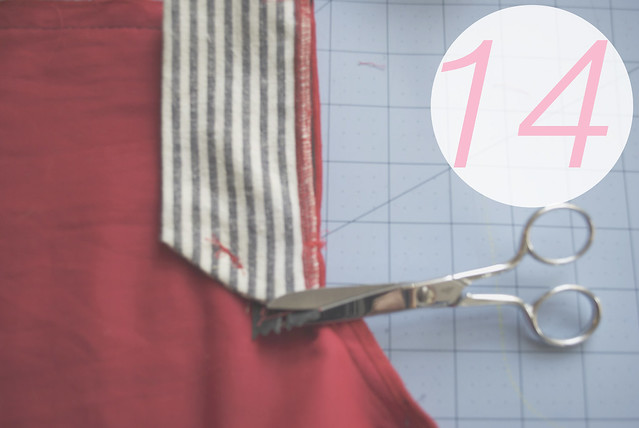
14. your entire fly apparatus should now lie neatly to the left. from the back, trim the bottom of the zipper tape so its not hanging below the fly.

to give you an idea of how your fly might look with all the topstitching bells and whistles - here is a close up of my (already well worn) denim pair.


aaaaaaaaand! your done!!!!


use your seam ripper to undo the basted CF seam and give that zip fly a few good zips! friends - you just sewed a zip fly! fly-phobics, that wasn't too bad was it? any holes in the crotch? any completely unrepairable mistakes? i hope not.

the next thing you will want to do is sew in your pockets - but that, gentles and ladymen, will be one of the subjects for our next, and final, clover trouser tutorial.

for the first two tutorials in this series:

xx

1.24.2012

tutorial: fun with clovers - part two

aaand we're back!

this post will finish up all the adjustments you have to make to your paper pattern in order to turn your clovers into clover trousers. today i will be showing you how to draft some pockets and to adjust your waistband to accommodate your knew zip front fly.

adding pockets to your patterns is such a nice, easy way to customize the look. and this can be done to practically any pattern. as a matter of fact, casey did a tutorial this past summer on adding shaped pockets to her colette ginger pattern. the results were so cute!

but enough chit chat - lets get started.

materials you will need:
  • your colette clover front pattern - with your zip fly adjustments
  • your colette clover front waistband pattern - all fitting adjustments made
  • pen/pencil
  • ruler, measuring tape, etc.
  • french curve - optional (truth be told, i've always eyeballed my curves up until recently when i got a french curve for christmas)
1. locate the hip mark on your pants pattern front (the circle). measure about 1/2 an inch to 1 inch below that on the stitching line and make a mark.


2. at the top of your pants pattern - along the waistband seam - measure in from the stitching line about 1 inch to 1 1/2 inches. make a mark.


3. connect these two points using a straight ruler (for a straight edge pocket - this is what i did on my denim pair of clovers) or with your french curve (as demonstrated above) or experiment with your pocket shape - as in casey's tutorial mentioned above. this is where your design can shine! (and i rhyme!)

4. cut two pieces of tracing paper (or some other sort of see-through paperiness) about 8 x 10 inches. lay one piece over your pants front pattern - covering your waistband line and hip line. mark your pocket placement with two dots, and trace your original hip line and waistband line.


5) measure in from the top corner on your pants front about 6 inches, and down along the hip line about 9 inches. draw a horizontal and a vertical from these two points. you can have these two lines meet at a sharp corner - or round the corner as shown above.

6) place a little bit of tape on your tracing paper to hold it in place - then lay your second piece of tracing paper over both layers. mark your pocket placement with two dots. this time trace the line you made in step 3 for your pocket opening, then follow the lines for the pocket you drafted in step 5.


7. you should now have two pocket pieces. the bottom pocket and the top pocket (facing). measure out from the stitching line 5/8 of an inch to give yourself some seam allowances. theres no need to draw the seam allowances around the inner pocket part - but you can if you want.


8. on your pants pattern front, measure out 5/8 of an inch from your pocket opening line that you made in step 3 and draw in your new seam allowance. trim away the excess hip piece (optional - you can leave it intact as well, just make sure you trace the correct line onto your fabric). and now you've drafted your pockets!

lets move on to the waistband...


1. if you trimmed your pants front pattern, lay your bottom pocket piece over your front pants piece, aligning the edges, so you have the full length of the top waistband seam. measure your stitching line from the outer corner into the edge of your extended fly piece that you drafted earlier. make a note of the measurement.


2. measure along the bottom of your clover front waistband (i made the mistake of measuring along the top at first and nearly had a heart attack - i thought my measurements were way off!)

*tip* i highly recommend checking all your waist measurements after doing your fitting adjustments. i found that after i fitted my clovers, my back waistband went down a size and my front waistband went up two sizes. its important you measure these separately rather than just check the entire waist measurement - or else your side seams won't line up.


3. measure out from the CF (center front - the dashed line on the pattern that was originally marked "place on fold" however we are going to ignore that) the additional amount needed for your waistband measurement to match your pants front measurement. make a mark for both the top and bottom and connect them with a vertical line. extend the front waistband to this line - you can use a french curve to continue the curve, or a straight edge, or your eyeballs.


4. if you haven't omitted it already, cross out the instructions to "place on fold" and instead write "cut 4" and "cut 2" for the interfacing. extend the seam allowances.

and that's it!


you now how have all the pieces you need to make yourself some fancy pants! err... trousers...

the next step will be for you to cut out all your pattern pieces from your fashion fabric and interfacing. A few tips:
  • for a more comfortable waistband, try cutting your pieces on the bias. this builds some stretch into them - its something i noticed on a lot of my ready to wear pants. to do this you will have to trace your back waistband so its the whole thing (not half) since you won't be placing it on the fold.
  • try a contrasting fabric for your pocket bags, waistband facings, and right fly extension piece. sure no one but you will see it, but it will make you smile every time you do!
  • when cutting your waistband pieces - its not a bad idea to cut the fronts a little longer, just in case your right fly extension ends up longer than expected - i learned this from experience! or you can just be proactive and check your measurements now!
thats it for today! in the next post i'll show you how to sew your zip front fly - always a bit of a nail biter!

if you missed the first part of this tutorial you can find it here:

xx

1.19.2012

tutorial: fun with clovers - part one

many moons ago, when i was just a young buck, in the days before i knew of such things as "red jackets" and "couture techniques", when life was, dare i say, a bit more innocent...

i had a vision. a vision that one day i would bring my knowledge to this blog and share it with all who wished to share it with me. that we might learn together. is this a utopian ideal?

no. this is sewing with sallie.


thats right! i am pleased to introduce my first ever official tutorial (besides the tutorial i scribbled on a random napkin as an afterthought one day. that one doesn't count)

in the back of my brain, in between red jacket madness, job changes, christmas and the like, i've been rolling around the idea to share how i made my changes to the colette clover pants pattern.

in case you missed it, i blogged about these pants (and shirt) here. i love taking a great, versatile pattern, like clover, and finding a way to make it my own. i already feel like this pattern will have future iterations - but for now, i'd like to show you how i took the clover pattern, a simple, elegant, slim fitting, side zip pant, and gave them a more masculine edge with some trouser details. i will be splitting these tutorials into as many posts as it takes - for my own sanity. i'm thinking right now it will take about 4.

in these tutorials, i will show you how to:
  • draft and sew a front zip fly
  • draft and sew side pockets
  • convert the clover waistband to a button/tab closure at center front

the pants i made above also have single welt pockets on the rear, however i won't be showing you how to do that in my tutorial since i think there are already a lot of great tutorials lurking around the internet on how to do that. like this one. or this one.

so lets begin, shall we?

materials you will need:
  • your clover pattern with all fitting adjustments made
  • tracing paper - or whatever pattern paper you fancy
  • pen/pencil/marker
  • ruler
  • french curve, or your eyeballs
now if you are anything like me, by the time you managed to get your clovers to fit you satisfactorily, your pattern may look a little something like this:

kinda gnarly. so the first step will be to:

1. trace your adjusted clover pants pattern onto a clean piece of tracing paper, transferring all marks, grainlines, etc. since we are only making adjustments to the front pattern piece you can just trace that if you prefer.

2. to draft the front fly, begin by drawing a straight horizontal line from the circle on the hip over to the CF (center front) crotch. label the point where your line and CF meet point A.

3. working from the sewing line - not the outside of the seam allowance - extend the top edge from the CF to the right by 2 inches. label this point B.

4. make a mark 1 1/4 inches to the left of your CF seam. label this point C.

5. draw a vertical line from point B down to point A, curving your line toward CF about an inch above A. use a french curve to help you if you are uncomfortable eyeballing the curve. the length of this line will vary depending on the length of your crotch depth/front rise.

6. draw a line from point C to point A - mirroring the curve of line B - A. As you can see from my example, I didn't quite like the angle of my first line, and so changed it to be more parallel to the angle of my CF line. To be perfectly honest, it doesn't really matter - but for accuracy sake its nice for those two lines to be parallel. I also attempted to mask out my seam allowance line because I was finding it distracting. As you can see... it didn't do much.

7. draw a dashed line 1/4" to the right of line C - A. this will mark where you will be topstitching (should you choose to topstitch).

8. mark a point 1/2 inch above where line A intersects the CF seam.

9. make a note to "baste" from the top of your pants on the CF seam to your dot you just marked.

10. to draft your pants right fly extension (don't worry about what this is at this point - all will be revealed in good time!) you will need to find a clean piece of paper. draw a line approximately 4 1/2 inches long.

11. measure out to the right of this line 2 3/4 inches. draw a line.

12. square a line down from this line - extending it approximately 5 1/2 inches.

13. connect the two parallel lines along the bottom with a gently curved line. use your french curve for guidance if you don't feel comfortable eyeballing.

14. make a note on the left hand side of this piece (the shorter side) to "cut on fold". you will only need to cut one of these pieces. no need to add seam allowances.

*note* the measurements for this piece were based off of my own clover pattern - if your front rise is significantly longer than mine your right fly extension piece may need to be longer. please check the length of the fly you drafted onto your front clover pattern and make any changes to your right fly extension piece accordingly. (the short side of the right fly extension should be about 1/2 inch longer than the length of your fly)

congratulations! you just drafted a zip front fly! not too hard, huh? before you finish - extend those seam allowances along the top of your clover front pattern to meet up with your new fly front.

in the next post i'll show you how to draft some pockets and make changes to your clover waistband to accommodate your new zip fly.

feel free to leave any questions you may have in the comments and i'll try and answer them as best i can. and yay for fun with clovers!!!

xx


1.17.2012

and now...

time for some gratuitous construction shots!


views of the single welt pockets, (invisible) draw stitched collars with pick stitching along the edge, and fell stitched neckline.


so. much. fell stitching! plus little thread bars to hold the back pleat in the lining in place.

i would be a liar if i said this jacket is perfect. its not. not even close. but that doesn't stop me from being pleased as punch with the final outcome! it has plenty of little kinks to it - places where i may have been a bit overzealous with the steam, areas where i fudged my way through the finer details of tailoring, or got so caught up in the details i wasn't seeing their effect on the garment as a whole. does this ever happen to you?

i tell you this now, because it is with some trepidation that i show you these rather intimate images of my jacket, an object that few of you will ever examine in real life. i feel as if i'm laying it bare. exposing all my wonky little stitches - my fumbling with the fabric.

and i remind myself that it's all a process of learning - something i hate! why can't i skip over the learning part and just be an expert already?!? but it doesn't work like that, does it?

i had to laugh a bit when i was reading claire's instructions on how to attach the sleeve lining to the coat lining by hand. She says that because of the excess fullness - the lining should be smooth, but it won't be as neat as a machine stitched lining. She calls this "a true sign of a hand-made garment".

it reminds me of what my husband says when i'm freaking out over some detail thats just not quite right. He says, "honey, thats how you know its handmade"...


xx